

3CX Phone System
Manufacturer: 3CX
Version: V20 and later
Manufacturer's website:www.3CX.de
Additional information:
Requirements
- Before installing 3CX v20, certain network requirements must be met. This includes the need for split DNS, which means that the 3CX FQDN must be fully resolvable both on the LAN and outside the LAN. This requires either a dedicated DNS server or a firewall that supports hairpin NAT.
- Please also note that if you are upgrading to v20, a system owner must be designated beforehand. If you created your system using Update 6, the first extension is the system owner by default. If your installation is older, you only have a root account. You do not have a system owner by default and must create one. For more information, see the following link:
Assigning a 3CX System Owner
1. Install the 3CX Phone System
Depending on the operating system you choose, you will need to run the 3CX phone system installation wizard. The procedures for Windows and Linux differ only slightly.
After successful installation, you will be automatically redirected to the dashboard.
Please use the firewall checker and click “Updates” to verify that your system is ready for the next setup steps.
2. Set Up a SIP Trunk
2.1 Add a trunk
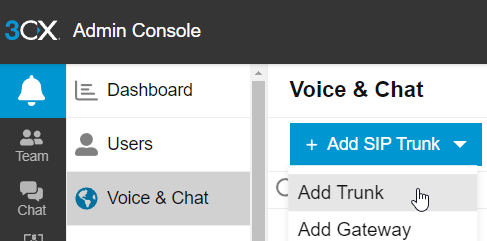
In the 3CX user interface, please click the “Admin” menu item in the lower-left corner.
Next, navigate to the “Trunks & Chat” section on the left side of the page and click the blue “Trunk” button to create a new trunk account. In the new window, select “Germany” as the country and “easybell” as the provider, then click “OK” to confirm.
2.2 Enter your login credentials
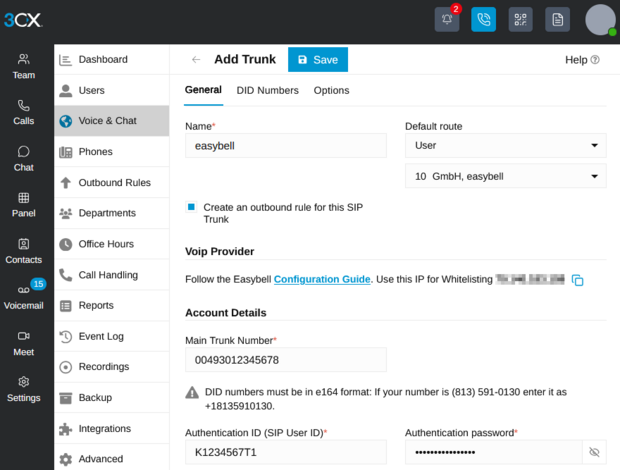
In the next window, you'll configure the trunk. You can choose any name you like.
In the SIP Trunk details, you can choose from trunk templates sorted by country. Under “DE” for Germany, you’ll find the “easybell” template.
Below that, please enter your SIP login credentials, which you can find in your Easybell customer portal.
Trunk primary phone number: Your phone number in international format without an extension (example: 00493012345678)
Authentication ID: SIP username
Authentication Password: SIP password
Where can I find the SIP login credentials?

You can find your SIP user name and SIP password in my.easybell. Go to "Telephone line" → “Connections” and expand the detailed view of the respective connection (Phone number for private customers).
Please use the following registrar: voip.easybell.de
Further information under "Where can I find my SIP access data?".
Optional: Encrypt phone calls
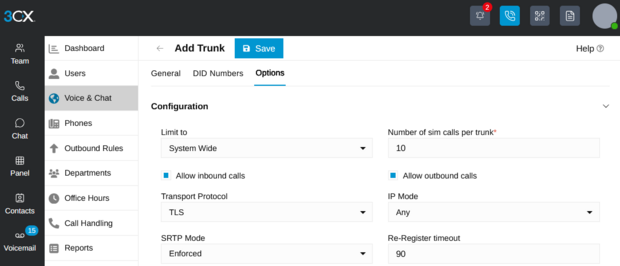
To encrypt calls, please go to the "Options" tab. Under "Transport Protocol," select the "TLS" option and set the SRTP mode to "Enforced."
3. Set up extensions (DDI/DID)
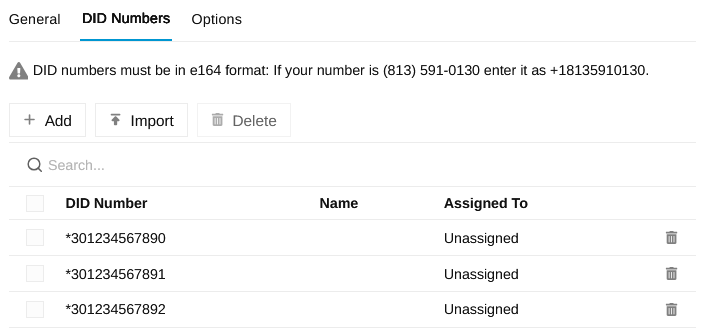
3.1. Enter Extensions
By clicking the “Add DID” button, you can enter additional extensions in the 3CX system. We recommend using wildcards here. This means that by placing an “*” before the area code, the phone number format remains flexible. This ensures that incoming calls can always be routed correctly.
3.2. Verify Registration
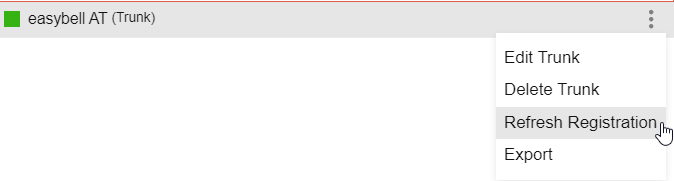
After saving, you will be redirected to an overview page where the Easybell account should already be marked with a green status dot.
If this is not the case, please click on “Update Registration.” If that does not resolve the issue, please check whether the SIP access credentials for the SIP Trunk have been entered correctly.
3.3 Assigning Extensions to the Extension
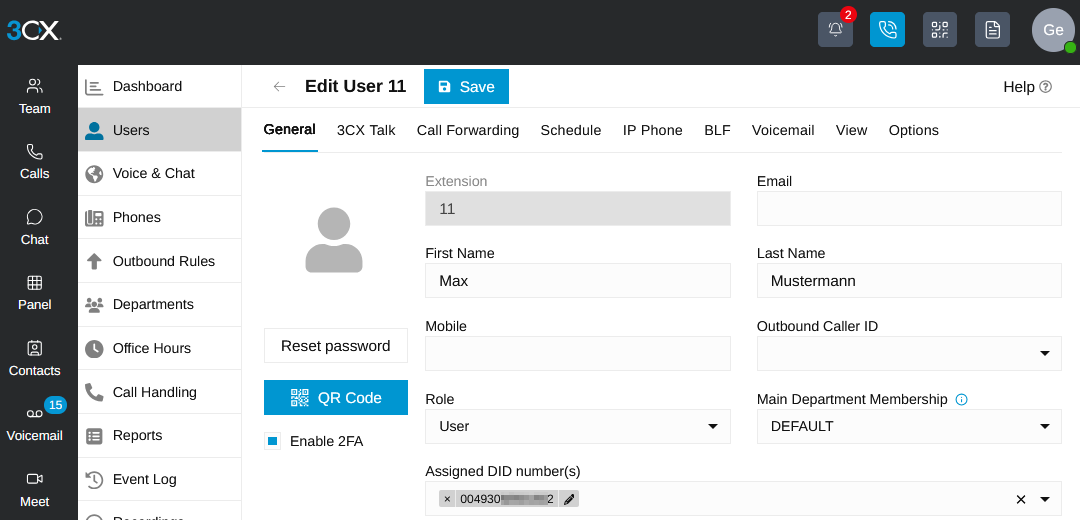
The extensions are now recognized by the system and can be assigned to internal extensions. Click the “Users” menu item and then the “+ User” button to create new users.
Here, you can enter the user information for the extension. Under “Assigned DID Number(s),” select the desired extension for the user.
In the “Outgoing Phone Number” field, you can enter the desired CLIP phone number. For more information on this, see the “CLIP no screening” section. You can also use the 3CX system’s built-in features here, such as voicemail, call forwarding, or scheduling.
After you have entered all the information, click “Save” to return to the user overview.
4. Set Up Outgoing Calls
4.1 Rules for Outgoing Calls
If you also want to use the Easybell trunk for outgoing calls, you’ll need to configure the outgoing rules in 3CX. Below, we’ll walk you through a basic configuration.
To do this, click the “Outgoing Rules” tab and then click “Add.”
To handle the common phone number formats selected by users, four outbound rules are required. The order of the rules is important:
1. International
2. National
3. +49
4. Regional
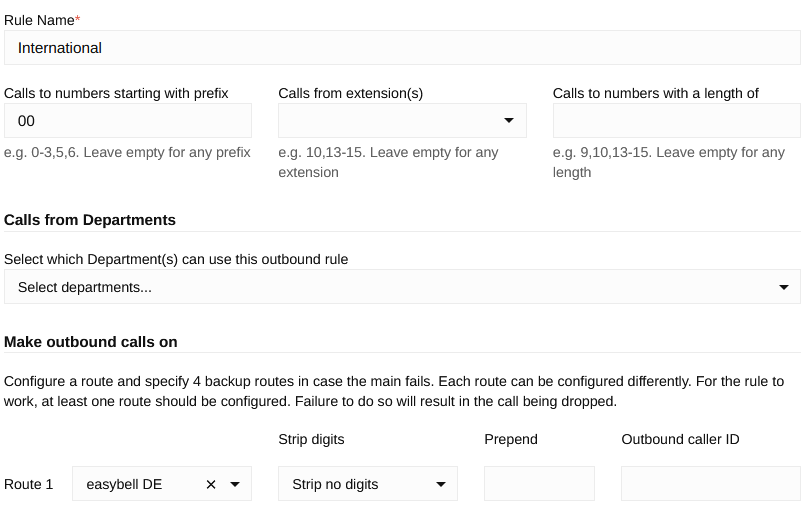
Rule 1: International
The rule named “International” applies to all cases in which the user has already dialed an international phone number (0049301231231). It responds to the “00” prefix and does not change the dialed number.
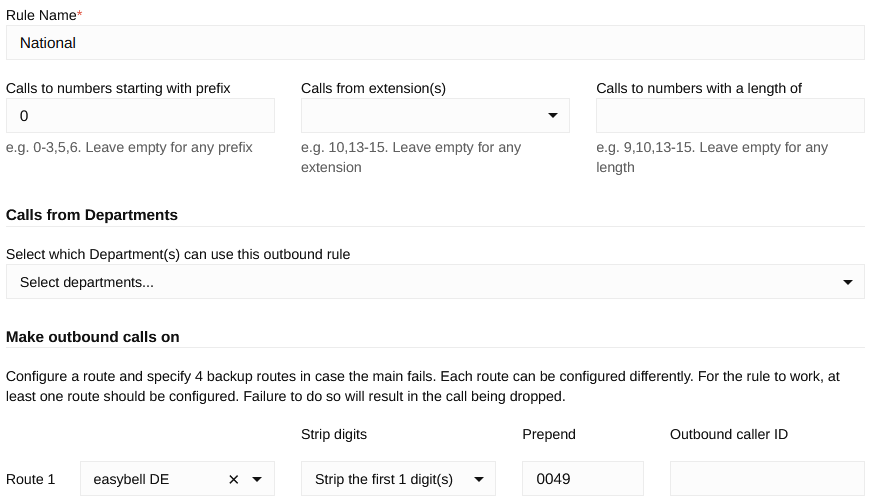
Rule 2: National
The “National” rule processes numbers that were dialed in the national format (0301231231). In this case, one digit must first be removed from the dialed number. In addition, the country code “0049” is prepended.
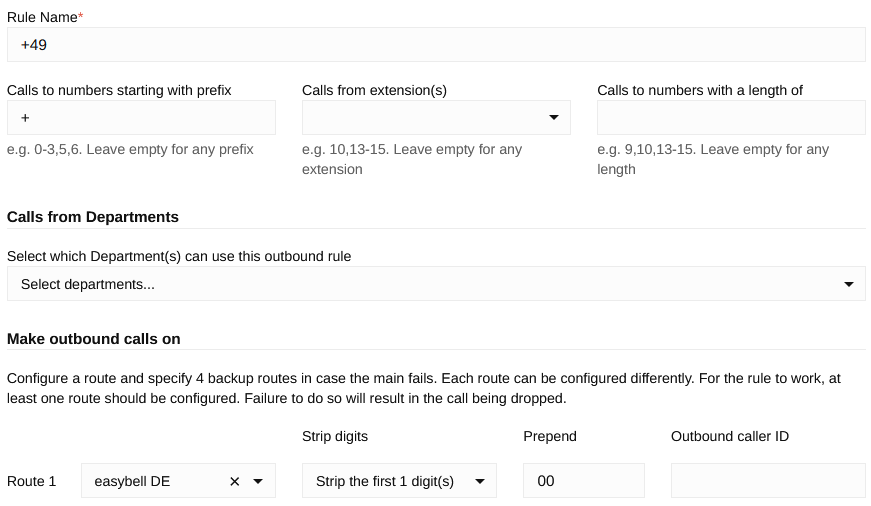
Rule 3: +49
"+49" applies to phone numbers dialed with a "+" sign (+49301231231). As is typically the case with "National," one character is truncated here as well, but in this instance, only the "00" is prepended.
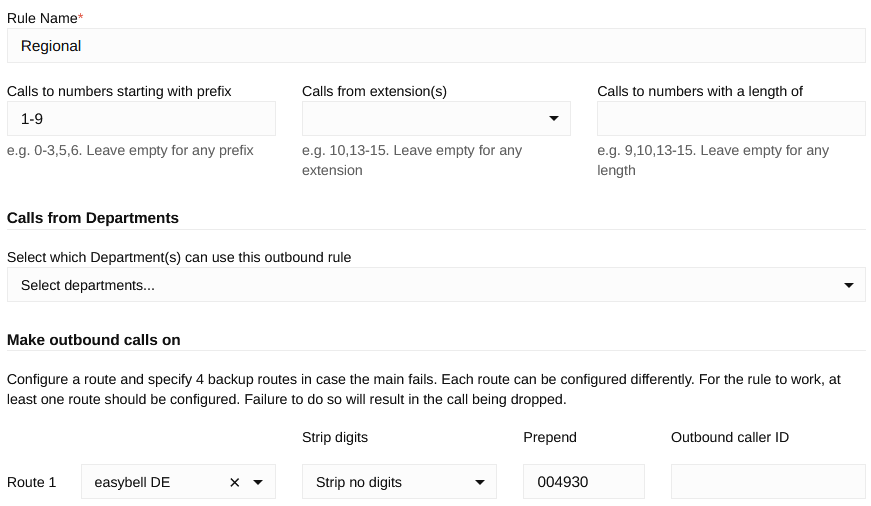
Rule 4: Regional
Finally, you must create the “Regional” rule, which applies when the user dials only the destination number without the country code and area code (1231231). In this case, no digits are truncated. The country code and area code must be prefixed to the number.
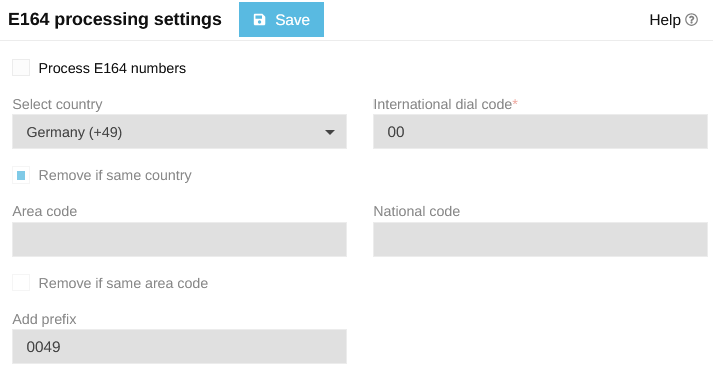
4.2 Disable E.164
To ensure that outgoing calls can be made in E.164 format (+49), E.164 processing must also be disabled in the advanced settings.
To do this, go to the “Advanced” tab and then select “E164.” Uncheck the box next to “Process E.164 numbers” and confirm by clicking “Save.”
5. CLIP: no screening
To transmit a phone number different from the main trunk number for outbound calls, you must configure settings in the 3CX phone system and the Easybell customer portal.
5.1 Caller ID (CLIP) in the Easybell Customer Portal

Please log in to my.easybell and go to “Telephone line” → “Connections”. Then open the “Configuration” settings for the connection you're using and locate the “Call line identification presentation (CLIP)” section.
Here, select “PBX determines caller ID (CLIP No Screening)” and then, under “Select the SIP field containing CLIP”, choose “From-Display (Default)” from the dropdown menu.
5.2 In the 3CX Phone System
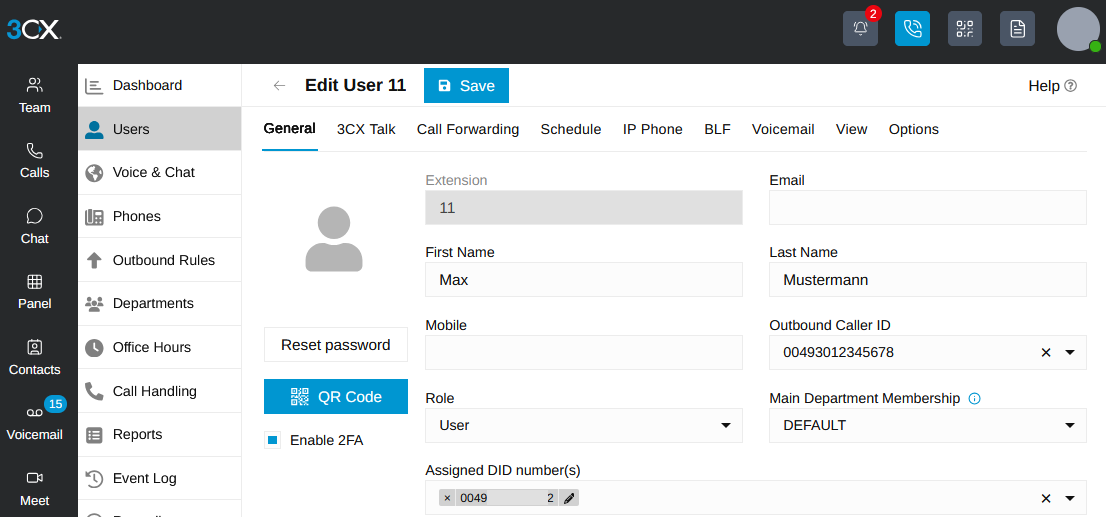
In the 3CX web interface, please go to the settings for the respective user. Here, you can enter the desired phone number in the “Outgoing Phone Number” field.
Please make sure that this number is entered in the international phone number format (0049301231231).
Click "Custom Phone Number" or press ENTER to save the phone number in the field. Confirm the configuration by clicking "Save."
Notes on Issues with IPv6
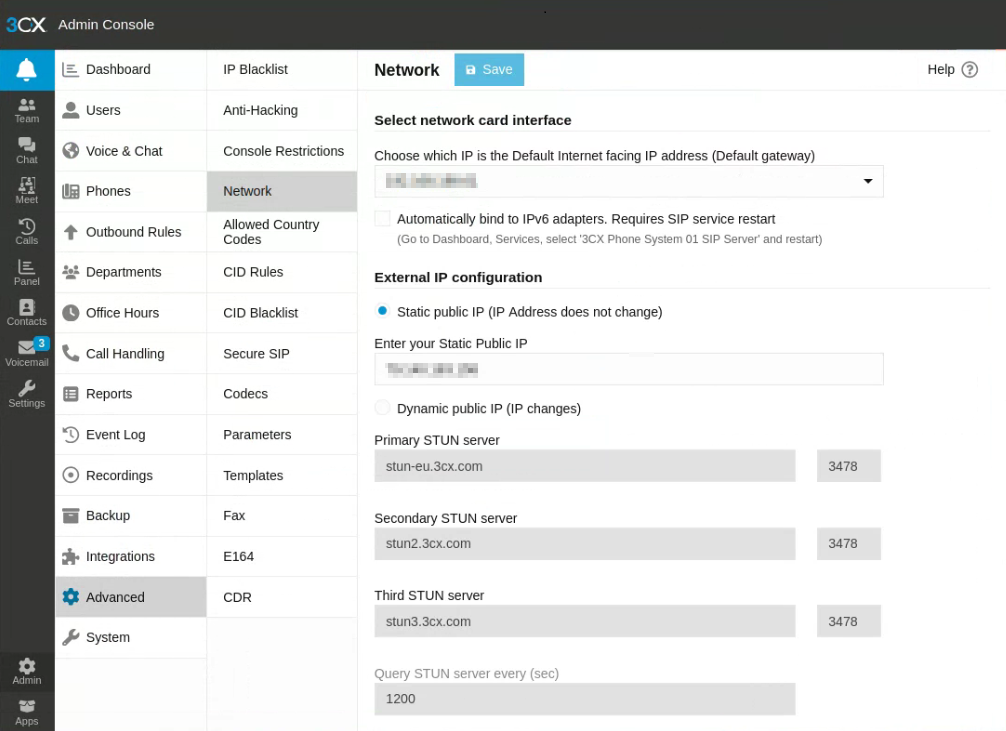
If you experience problems establishing calls or with audio transmission, this may be due to a partially configured internal IPv6 network.
Both Easybell and 3CX are IPv6-compliant and use IPv6 whenever possible. However, if you have a partially configured IPv6 network (without a public IPv6 address), IPv6 must be disabled in 3CX. To do this, please go to “Settings” → “Network” in the 3CX Administration Console and disable the option “Automatically connect to existing IPv6 interfaces.”